@阿里
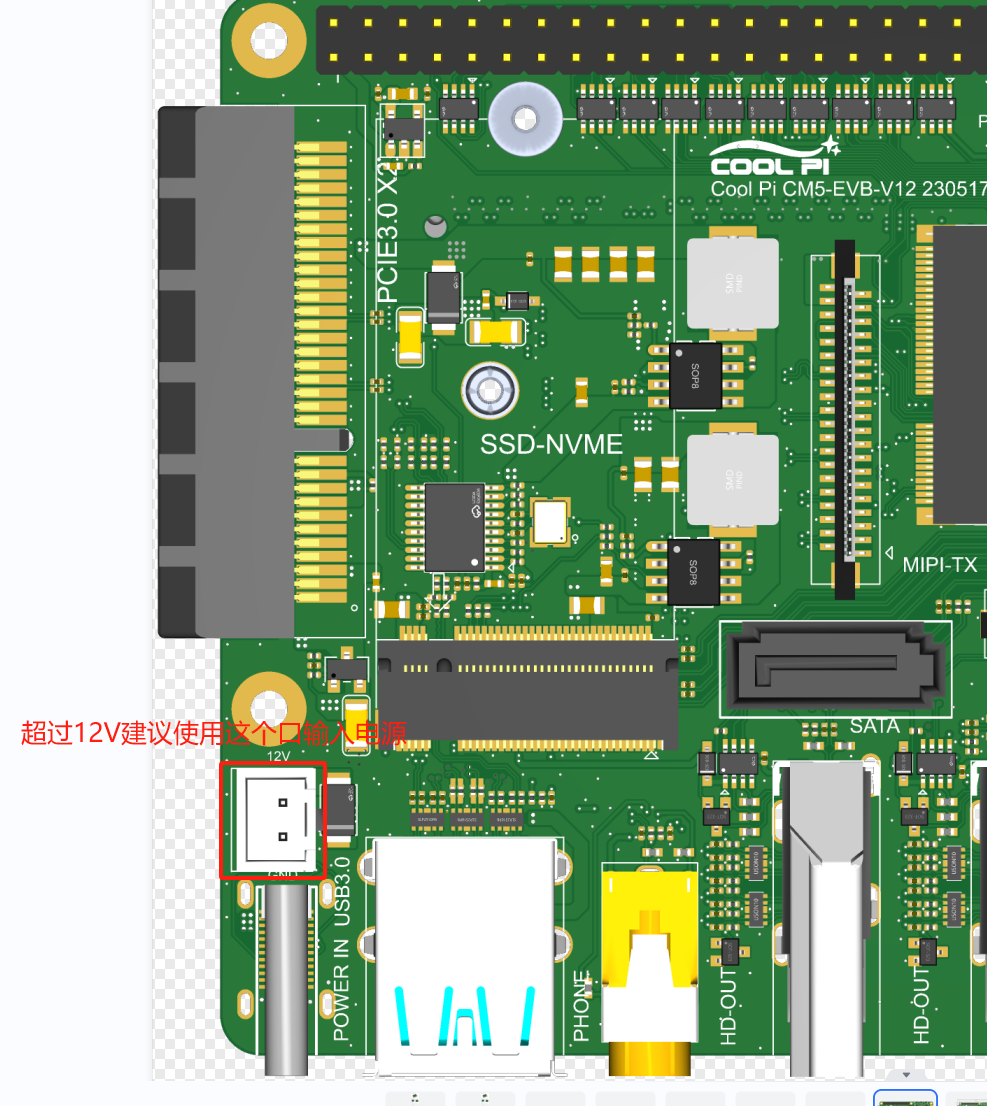
不会的!DCDC输入的电压可以到30V以上。超过12V的电源输入建议使用2PIN 2.54mm连接器,如下图所示:正常工作12V 1.5A就可以满足系统要求,如果有加其它外设比如移动硬盘 SSD之类的,根据实际情况增加电源功率。
G
Best posts made by george
-
RE: 电源底板上电最大可以上多大需要多少安培posted in Pi CM5
-
RE: CoolPi 4B: Change output pins of i2c3 and i2c5posted in Pi 4B
@maxpol I2C3 I2C5 cannot be changed to other pinsOf course, you can try opening other I2C channels.
-
CoolPi 4B硬件扩展四:GPIOposted in Hardware
40PIN连接器除了debug串口和I2C6,其它都可以用作通用IO。所有的GPIO都支持中断、上下拉和驱动强度配置。
GPIO列表
PIN序号 GPIO编号 节点编号 默认状态 IO电平 3 GPIO0_D5 29 UP TTL 3.3V 5 GPIO0_D4 28 UP TTL 3.3V 7 GPIO1_B7 47 UP TTL 3.3V 11 GPIO4_A0 128 DOWN TTL 3.3V 13 GPIO4_A1 129 DOWN TTL 3.3V 15 GPIO4_A2 130 DOWN TTL 3.3V 19 GPIO1_B2 42 DOWN TTL 3.3V 21 GPIO1_B1 41 DOWN TTL 3.3V 23 GPIO1_B3 43 DOWN TTL 3.3V 29 GPIO4_A3 131 DOWN TTL 3.3V 31 GPIO4_A4 132 DOWN TTL 3.3V 33 GPIO4_A5 133 DOWN TTL 3.3V 35 GPIO4_A6 134 DOWN TTL 3.3V 37 GPIO4_A7 135 DOWN TTL 3.3V 12 GPIO1_A7 39 UP TTL 3.3V 16 GPIO1_A1 33 DOWN TTL 3.3V 18 GPIO1_A0 30 DOWN TTL 3.3V 22 GPIO1_B0 40 UP TTL 3.3V 24 GPIO1_B4 44 UP TTL 3.3V 26 GPIO1_B5 45 UP TTL 3.3V 32 GPIO3_B1 105 UP TTL 3.3V 36 GPIO4_B2 106 UP TTL 3.3V 38 GPIO4_B3 107 UP TTL 3.3V 40 GPIO3_C3 115 UP TTL 3.3V 测试命令
向内核申请GPIO,写入对应的GPIO值直接申请,比如申请控制GPIO4A0,则使用命令:
echo 128 > /sys/class/gpio/export写入后,可以看到已经生成节点:
/sys/class/gpio/gpio128/相应gpio节点下面的接口,比如GPIO4A0:
root@ubuntu:~# ll /sys/class/gpio/gpio128/
total 0
drwxr-xr-x 3 root root    0 Nov 21 15:23 ./
drwxr-xr-x 3 root root    0 Nov 21 15:23 ../
-rw-r--r-- 1 root root 4096 Nov 21 15:24 active_low
lrwxrwxrwx 1 root root    0 Nov 21 15:24 device -> ../../../gpiochip4/
-rw-r--r-- 1 root root 4096 Nov 21 15:24 direction
-rw-r--r-- 1 root root 4096 Nov 21 15:24 edge
drwxr-xr-x 2 root root    0 Nov 21 15:24 power/
lrwxrwxrwx 1 root root    0 Nov 21 15:24 subsystem -> ../../../../../../class/gpio/
-rw-r--r-- 1 root root 4096 Nov 21 15:23 uevent
-rw-r--r-- 1 root root 4096 Nov 21 15:24 value
设置GPIO4A0为输出口
root@ubuntu:/sys/class/gpio/gpio128# echo out >direction
root@ubuntu:/sys/class/gpio/gpio128# cat direction
out
设置输出高电平
root@ubuntu:/sys/class/gpio/gpio128# cat value
0
root@ubuntu:/sys/class/gpio/gpio128# echo 1 >value
root@ubuntu:/sys/class/gpio/gpio128# cat value
1
实际万用表测试PIN 11输出的电压为3.3V
备注:
-
direction: 参数为“out”(输出)和“in”(输入),可读可写;
-
value: 参数为“0”(低电平)和“1”(高电平),可读可写;
-
edge:可以监听对应引脚的事件,需要把direction设置为输入
参数为”none”(无中断触发), “rising”(上升沿触发), “falling”(下降沿触发), “both”(上升、下降都沿触发),用户层可以使用poll,设置events为POLLPRI | POLLERR等待事件触发,当对应的模式触发后,会返回事件的消息,此时需要读取value值,以表示改触发已经处理,否则会一直poll到原事件; -
active_low:此值可以反转value中的值;
-
-
RE: merge back to armbian sourceposted in Armbian
@igorp
Recently, I have been working hard to push CM5 NOTEBOOK to the ARMBIAN mainline. Further information will be released as soon as possible. Thank you for your support.
https://www.cool-pi.com/topic/384/cool-pi-arm-notebook-preview

-
RE: 自定义bootloaderposted in Pi 4B
@zehui
启动的流程是一样的,目前uboot的结构如下:FIT description: FIT Image with ATF/OP-TEE/U-Boot/MCU Created: Wed Feb 28 09:32:41 2024 Image 0 (uboot) Description: U-Boot Created: Wed Feb 28 09:32:41 2024 Type: Standalone Program Compression: uncompressed Data Size: 1389728 Bytes = 1357.16 KiB = 1.33 MiB Architecture: AArch64 Load Address: 0x00200000 Entry Point: unavailable Hash algo: sha256 Hash value: e8eeabe5b2891390396b4cb77a33c5bb8da03b1da33a64274a077cf386f2b5aa Image 1 (atf-1) Description: ARM Trusted Firmware Created: Wed Feb 28 09:32:41 2024 Type: Firmware Compression: uncompressed Data Size: 200008 Bytes = 195.32 KiB = 0.19 MiB Architecture: AArch64 Load Address: 0x00040000 Hash algo: sha256 Hash value: c902200be1343fe569e54778c286005b1c6163606664c463a24d787be4376966 Image 2 (atf-2) Description: ARM Trusted Firmware Created: Wed Feb 28 09:32:41 2024 Type: Firmware Compression: uncompressed Data Size: 24576 Bytes = 24.00 KiB = 0.02 MiB Architecture: AArch64 Load Address: 0xff100000 Hash algo: sha256 Hash value: 225d6bf0712f850648223365ba06a73ba5f6315fb8a9580f23ab48ece795f91e Image 3 (atf-3) Description: ARM Trusted Firmware Created: Wed Feb 28 09:32:41 2024 Type: Firmware Compression: uncompressed Data Size: 24576 Bytes = 24.00 KiB = 0.02 MiB Architecture: AArch64 Load Address: 0x000f0000 Hash algo: sha256 Hash value: aa71013e72d7ab4be264c1093b155ef06e65d0a263d552be25b13c8ddf285586 Image 4 (optee) Description: OP-TEE Created: Wed Feb 28 09:32:41 2024 Type: Firmware Compression: uncompressed Data Size: 465304 Bytes = 454.40 KiB = 0.44 MiB Architecture: AArch64 Load Address: 0x08400000 Hash algo: sha256 Hash value: 66e30bf9e879405a49797aaa6c08ca1c41aa325443e910af42e3df309e65909b Image 5 (kern-fdt) Description: cp4/uboot.dtb Created: Wed Feb 28 09:32:41 2024 Type: Flat Device Tree Compression: uncompressed Data Size: 141854 Bytes = 138.53 KiB = 0.14 MiB Architecture: AArch64 Hash algo: sha256 Hash value: ba43bc47ab29f0cbcba25658712ac3d3c6349a30486c76d5b720310e58f02de3 Image 6 (fdt) Description: U-Boot dtb Created: Wed Feb 28 09:32:41 2024 Type: Flat Device Tree Compression: uncompressed Data Size: 7065 Bytes = 6.90 KiB = 0.01 MiB Architecture: AArch64 Hash algo: sha256 Hash value: 987a71d492c0045c4964bbed7799da0eee5276a2b60b5a1335fc2d37fdfcf944 Default Configuration: 'conf' Configuration 0 (conf) Description: rk3588s-cp4 Kernel: unavailable Firmware: atf-1 FDT: fdt kern-fdt Loadables: uboot atf-2 atf-3 optee -
CoolPi 4B硬件扩展二:Serial portposted in Hardware
串口位置
下表罗列了40PIN连接器可以用做UART功能的引脚,目前除了debug串口以外还可以扩展5路独立串口。最大波特率1.5M。IO电平是TTL 3.3V。注意:串口号和实际系统的节点不是一一对应,实际操作需要按照表格对应的设备节点。
序号 端口定义 描述 IO电平 设备节点 29 UART0_TX_M2 UART0 发送 TTL 3.3V /dev/ttyS6 31 UART0_RX_M2 UART0 接收 TTL 3.3V /dev/ttyS6 33 UART3_TX_M2 UART3 发送 TTL 3.3V /dev/ttyS3 35 UART3_RX_M2 UART3 接收 TTL 3.3V /dev/ttyS3 19 UART4_RX_M2 UART4 接收 TTL 3.3V /dev/ttyS4 23 UART4_TX_M2 UART4 发送 TTL 3.3V /dev/ttyS4 16 UART6_TX_M1 UART6 发送 TTL 3.3V /dev/ttyS2 18 UART6_RX_M1 UART6 接收 TTL 3.3V /dev/ttyS2 24 UART7_RX_M2 UART7 接收 TTL 3.3V /dev/ttyS7 26 UART7_TX_M2 UART7 发送 TTL 3.3V /dev/ttyS7 DTS配置
用户需要使用哪个串口在DTS打开对应节点即可,status = "okay"代表开启,status = "disabled"代表关闭。注意不使用UART功能确保对应节点的status是disabled状态,否则可能会导致其它功能异常。
&uart0 {
	pinctrl-names = "default";
	pinctrl-0 = <&uart0m2_xfer>;
	status = "okay";
};

&uart3 {
	pinctrl-names = "default";
	pinctrl-0 = <&uart3m2_xfer>;
	status = "okay";
};

&uart4 {
	pinctrl-names = "default";
	pinctrl-0 = <&uart4m2_xfer>;
	status = "okay";
};

&uart6 {
	pinctrl-names = "default";
	pinctrl-0 = <&uart6m1_xfer>;
	status = "okay";
};

&uart7 {
	pinctrl-names = "default";
	pinctrl-0 = <&uart7m2_xfer>;
	status = "okay";
};
shell测试命令
功能测试采用回环测试(对应串口的TX RX信号短接)。
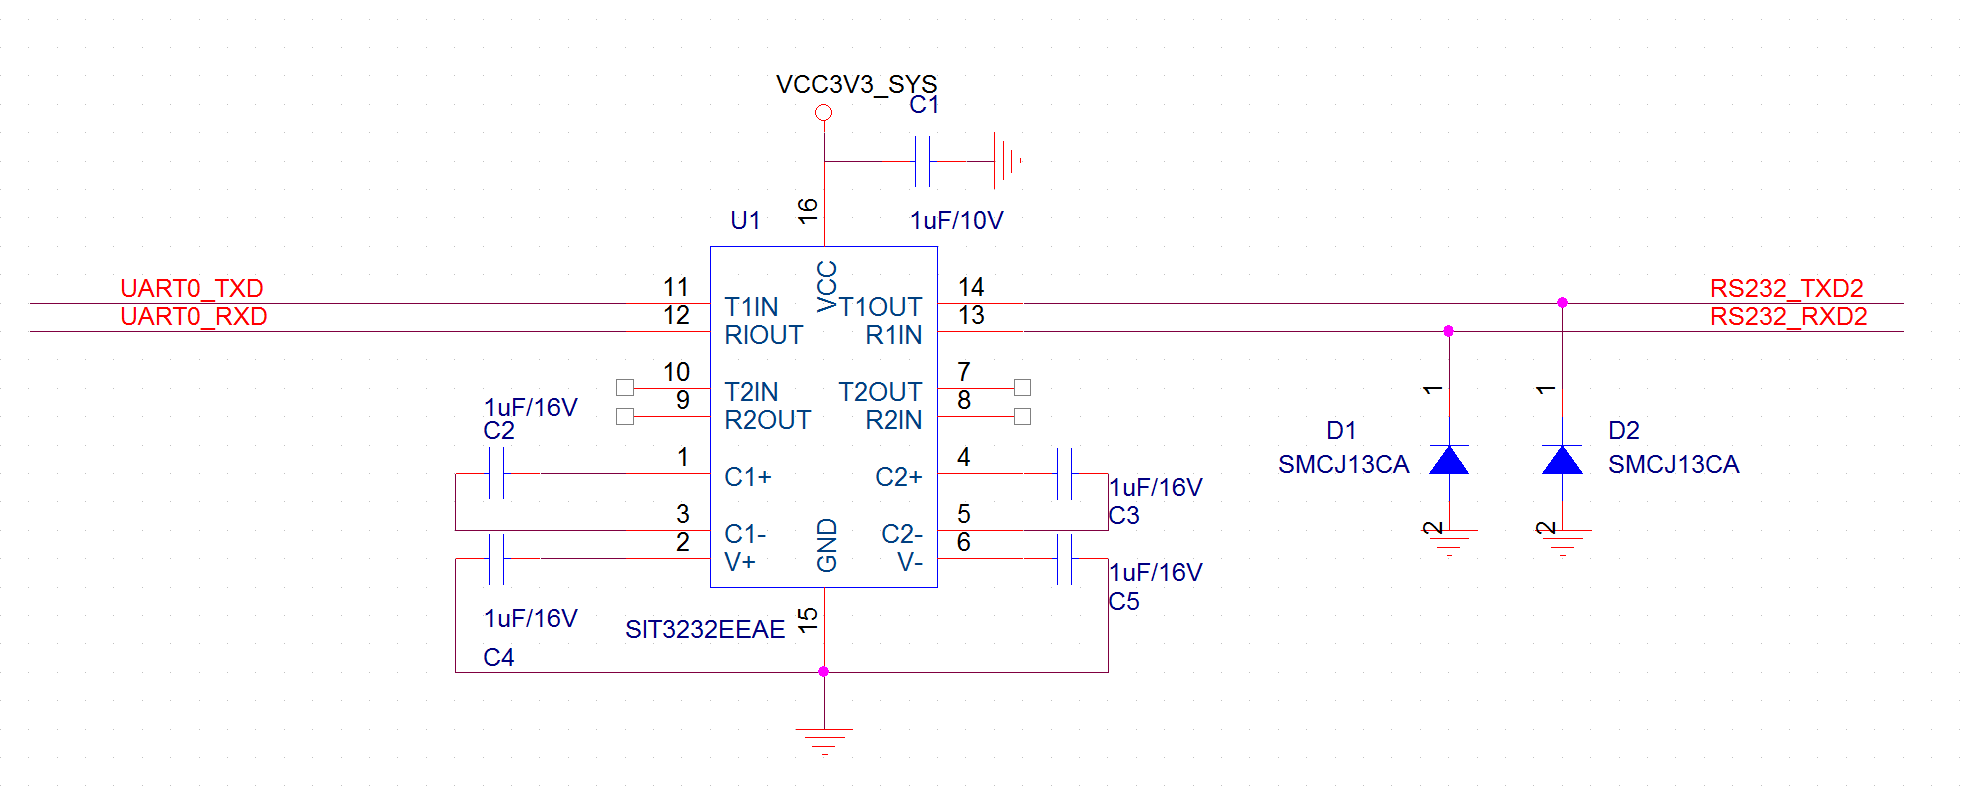
stty -F /dev/ttyS6 raw speed 115200 //配置PIN29 PIN31对应的串口波特率为115200
echo "hello world" > /dev/ttyS6 //发送字符串
cat /dev/ttyS6 //接收字符串
RS232电路
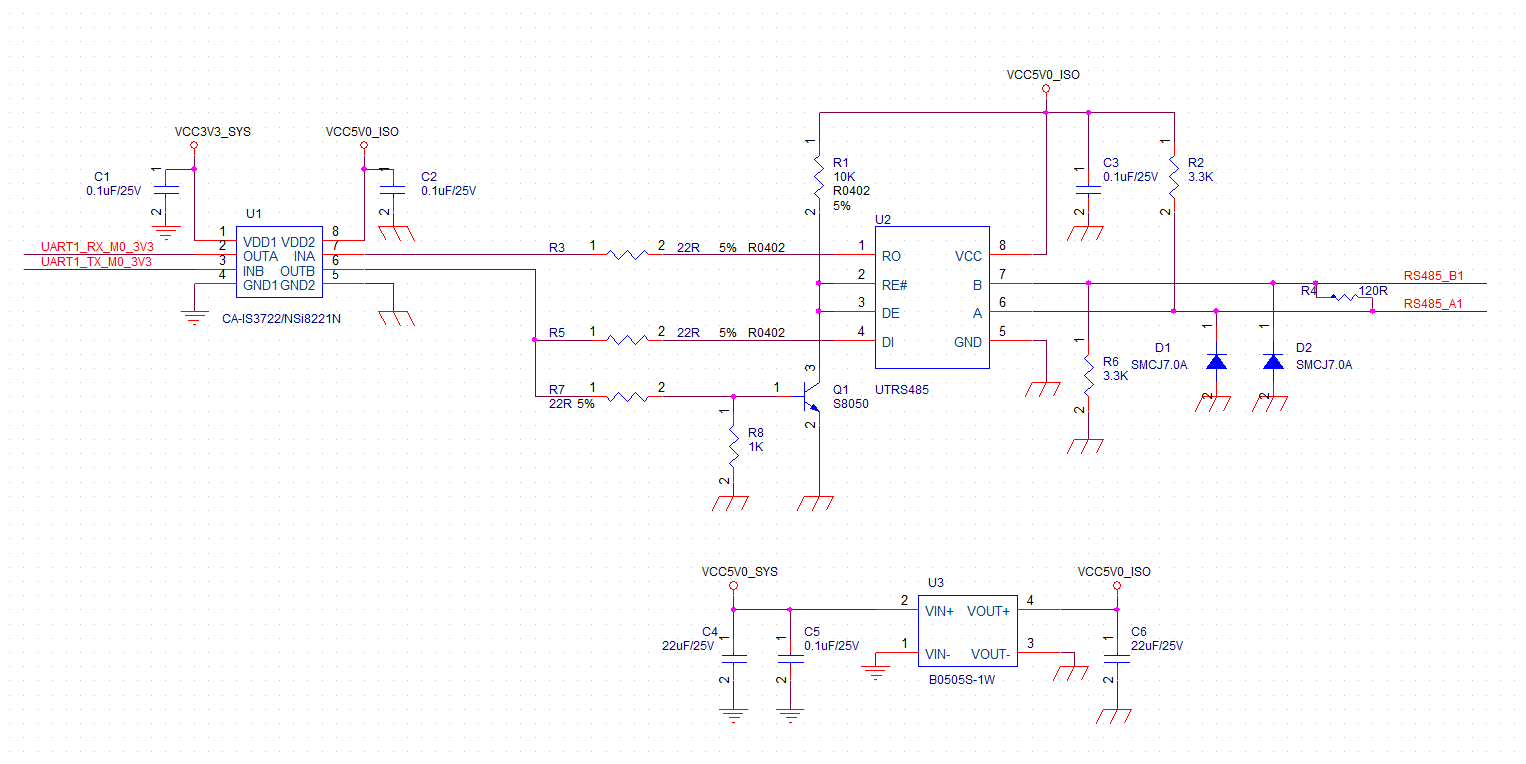
隔离485电路
-
RE: Heatsync optionsposted in Peripheral
@zensation The radiator can be matched with raspberry pi. A separate fan is OK. Normally, it is not necessary to add aluminum alloy fins on the CPU.
-
RE: RKDevTool和rkdeveloptool的功能区别posted in Pi 4B
@zehui
1.目前硬件是强制SPI启动的,如下图硬件配置,如果要改为扫描启动方式,可以去掉R18的电阻。
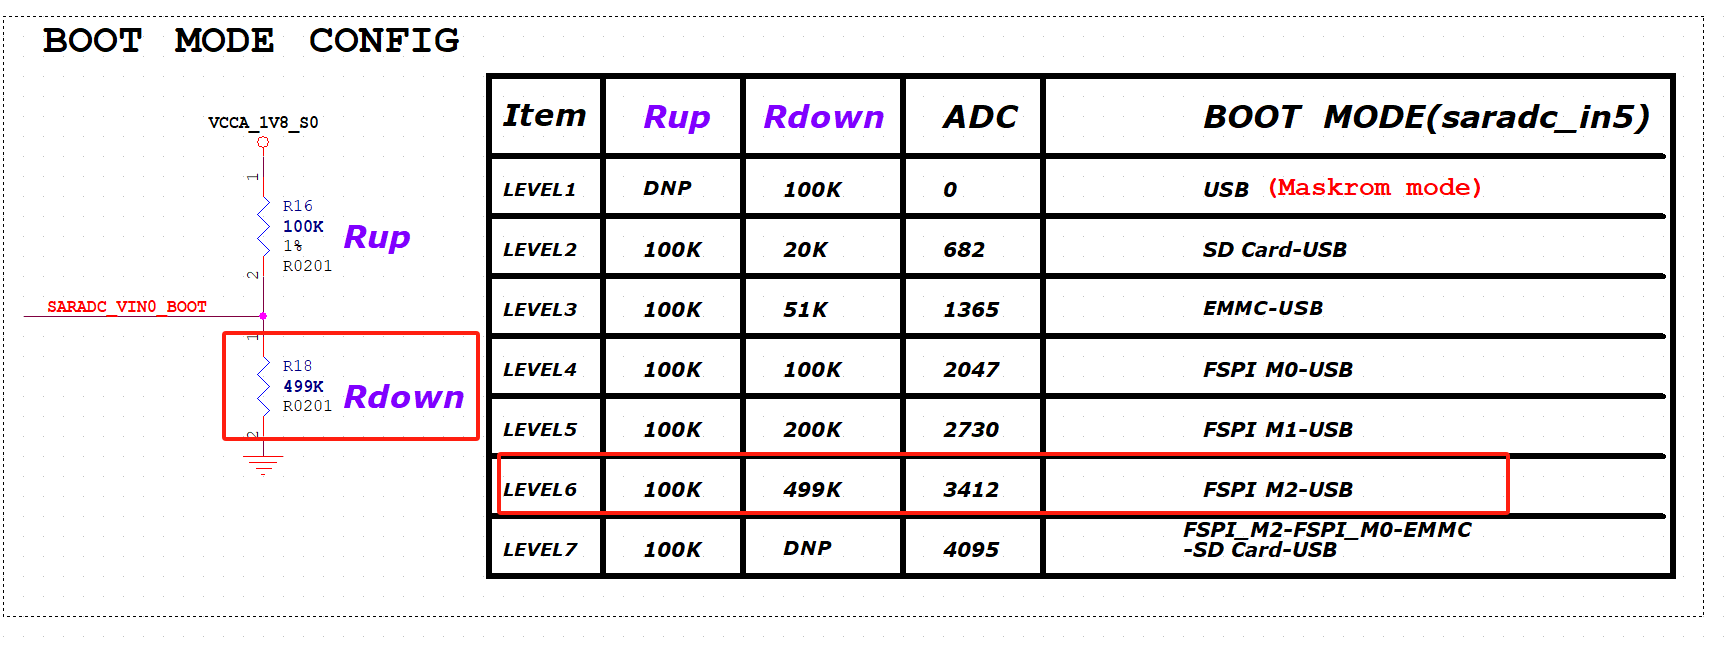
2.目前使用的是rockchip的loader和uboot。github的uboot源码有包括SPL部分。用户可以自行修改,DDRBIN目前没有开放源码只有二进制文件。 -
CoolPi 4B硬件扩展三:I2Cposted in Hardware
如下表所示,coolpi 4b的40PIN连接器可以引出4组I2C总线出来,其中I2C1 I2C3 I2C5是独立I2C接口,机器内部没有和其它设备复用,I2C6板子内部有接RTC时钟芯片HYM8563,地址为51H,所以外设使用I2C6端口的时候注意地址不要冲突。
I2C位置
序号 端口定义 描述 IO状态 3 I2C1_SDA_M2 I2C1数据 Internal 2.2K Pull up 3.3V 5 I2C1_SCL_M2 I2C1时钟 Internal 2.2K Pull up 3.3V 27 I2C6_SDA_M3 I2C6数据 Internal 2.2K Pull up 3.3V 28 I2C6_SCL_M3 I2C6时钟 Internal 2.2K Pull up 3.3V 31 I2C3_SCL_M2 I2C3时钟 Internal 2.2K Pull up 3.3V 33 I2C3_SDA_M2 I2C3数据 Internal 2.2K Pull up 3.3V 35 I2C5_SCL_M2 I2C5时钟 Internal 2.2K Pull up 3.3V 37 I2C5_SDA_M2 I2C5数据 Internal 2.2K Pull up 3.3V DTS配置
设备驱动的配置方式参考I2C6节点,注意不使用I2C功能确保节点的status为disabled,否则可能会导致其它功能异常。
&i2c1 {
	status = "okay";
	pinctrl-names = "default";
	pinctrl-0 = <&i2c1m2_xfer>;
};

&i2c3 {
	status = "okay";
	pinctrl-names = "default";
	pinctrl-0 = <&i2c3m2_xfer>;
};

&i2c5 {
	status = "okay";
	pinctrl-names = "default";
	pinctrl-0 = <&i2c5m2_xfer>;
};

&i2c6 {
	status = "okay";
	pinctrl-names = "default";
	pinctrl-0 = <&i2c6m3_xfer>;

	hym8563: hym8563@51 {
		compatible = "haoyu,hym8563";
		reg = <0x51>;
		#clock-cells = <0>;
		clock-frequency = <32768>;
		clock-output-names = "hym8563";
		pinctrl-names = "default";
		pinctrl-0 = <&hym8563_int>;
		interrupt-parent = <&gpio0>;
		interrupts = <RK_PB0 IRQ_TYPE_LEVEL_LOW>;
		status = "okay";
	};

};
测试工具及方法
git clone git://git.kernel.org/pub/scm/utils/i2c-tools/i2c-tools.git cd i2c-tools make -j8 sudo make install root@ubuntu:/# i2cdetect -y 6 0 1 2 3 4 5 6 7 8 9 a b c d e f 00: -- -- -- -- -- -- -- -- 10: -- -- -- -- -- -- -- -- -- -- -- -- -- -- -- -- 20: -- -- -- -- -- -- -- -- -- -- -- -- -- -- -- -- 30: -- -- -- -- -- -- -- -- -- -- -- -- -- -- -- -- 40: -- -- -- -- -- -- -- -- -- -- -- -- -- -- -- -- 50: -- UU -- -- -- -- -- -- -- -- -- -- -- -- -- -- 60: -- -- -- -- -- -- -- -- -- -- -- -- -- -- -- -- 70: -- -- -- -- -- -- -- -- I2C6节点上可以扫描到地址为51H的设备,即HYM8563。工具也支持其他读写操作。可以自行研究。 -
Cool Pi Cm5-Laptop Linux Quick Start Guideposted in PI CM5 Laptop
Machine Introduction
COOLPI CM5 open-source notebook is a product that combines high performance, portability, and open-source spirit. It not only meets the basic computing needs of users, but also provides an ideal platform for those who enjoy free exploration and technological creation.
Installing the system
The machine is installed with Ubuntu 22.04 system by default at the factory. If users need other versions, they can update them according to the following tutorial.
The default username for the machine is: coolpi Password: 123Download image
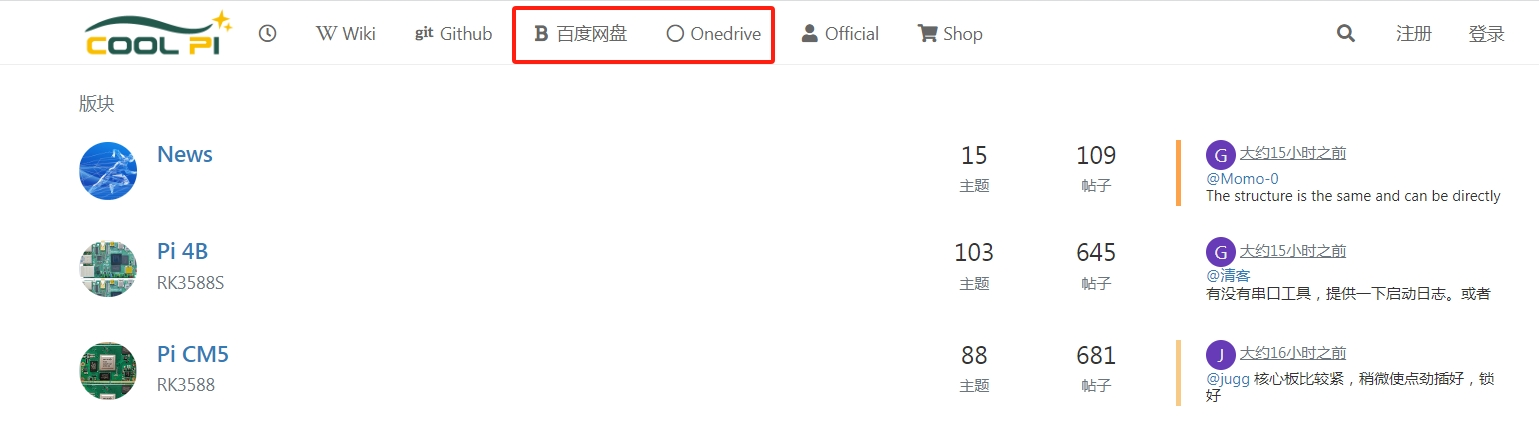
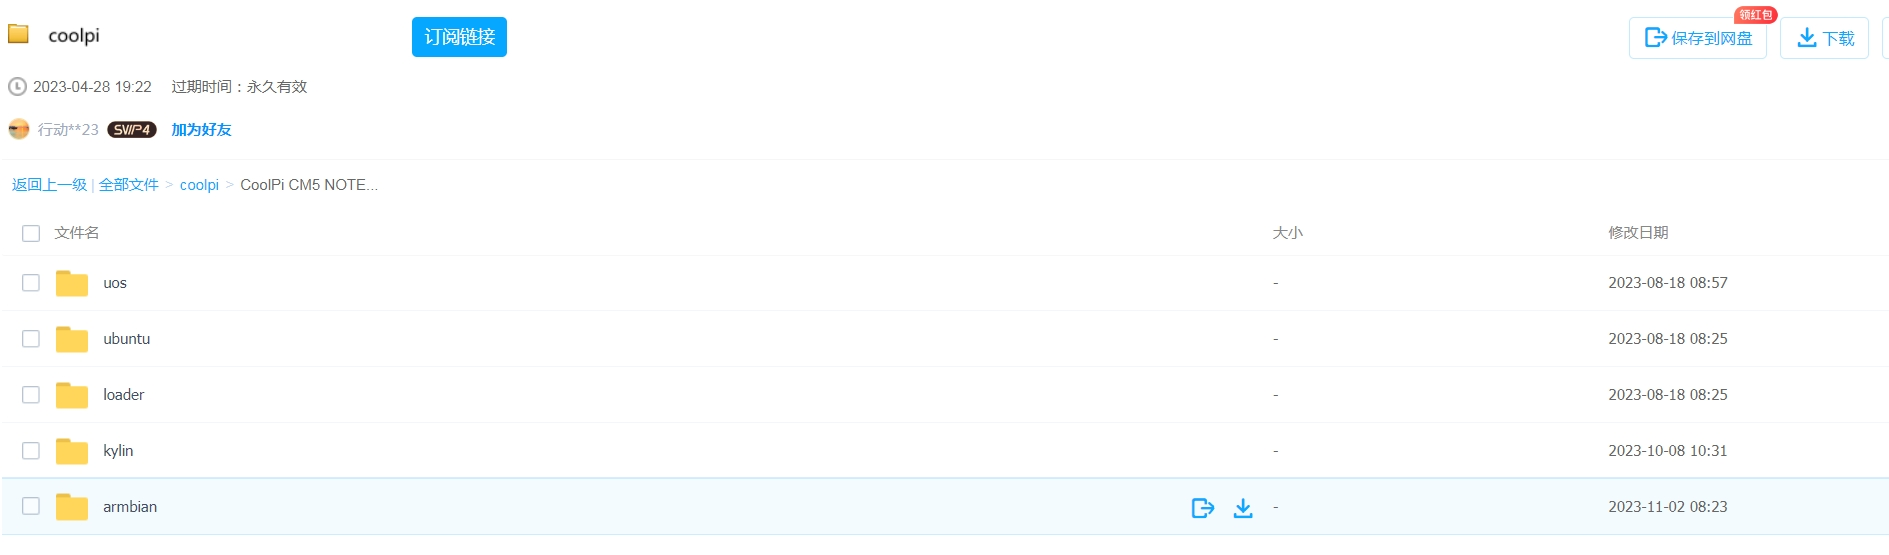
As shown in the following figure: System images can be downloaded through 百度网盘 or Onedrive.
Select the image that needs to be updated, and the image type will continue to be updated.
Download tools
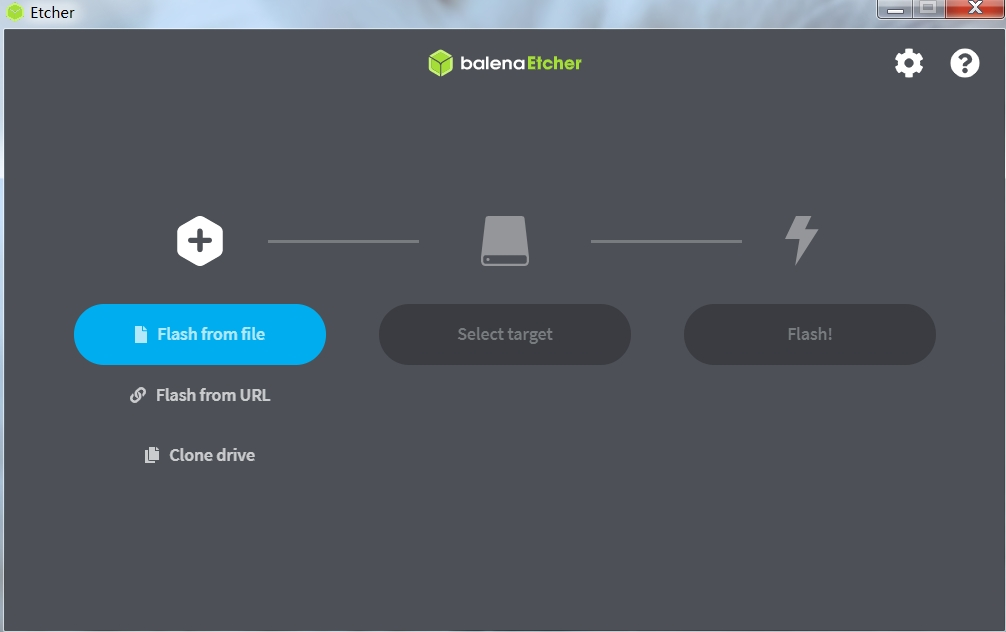
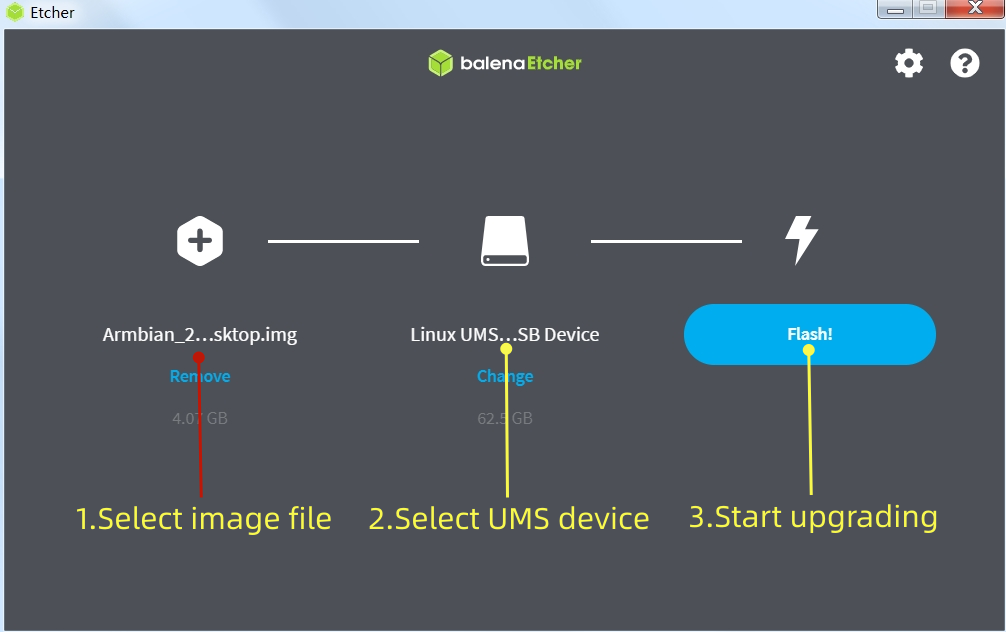
Coolpi defaults to using Etcher to update system images, which can be obtained through Baidu Cloud, Onedrive, or the official website.
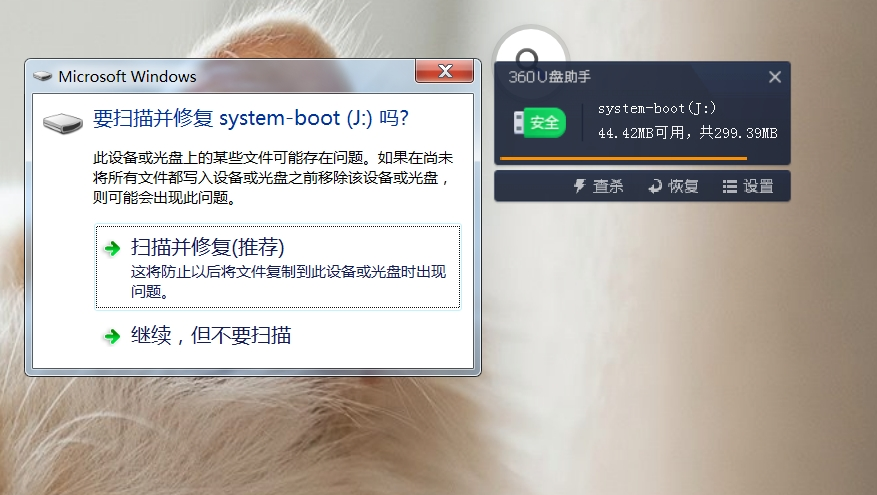
Machine enters UMS mode
The Type-C port of the machine is connected to the computer. When the Coolpi laptop is turned off, it can quickly press the power button multiple times, usually no less than 8 times, and the machine will enter MUS mode. The computer will recognize an icon for a USB drive. As shown in the following figure:
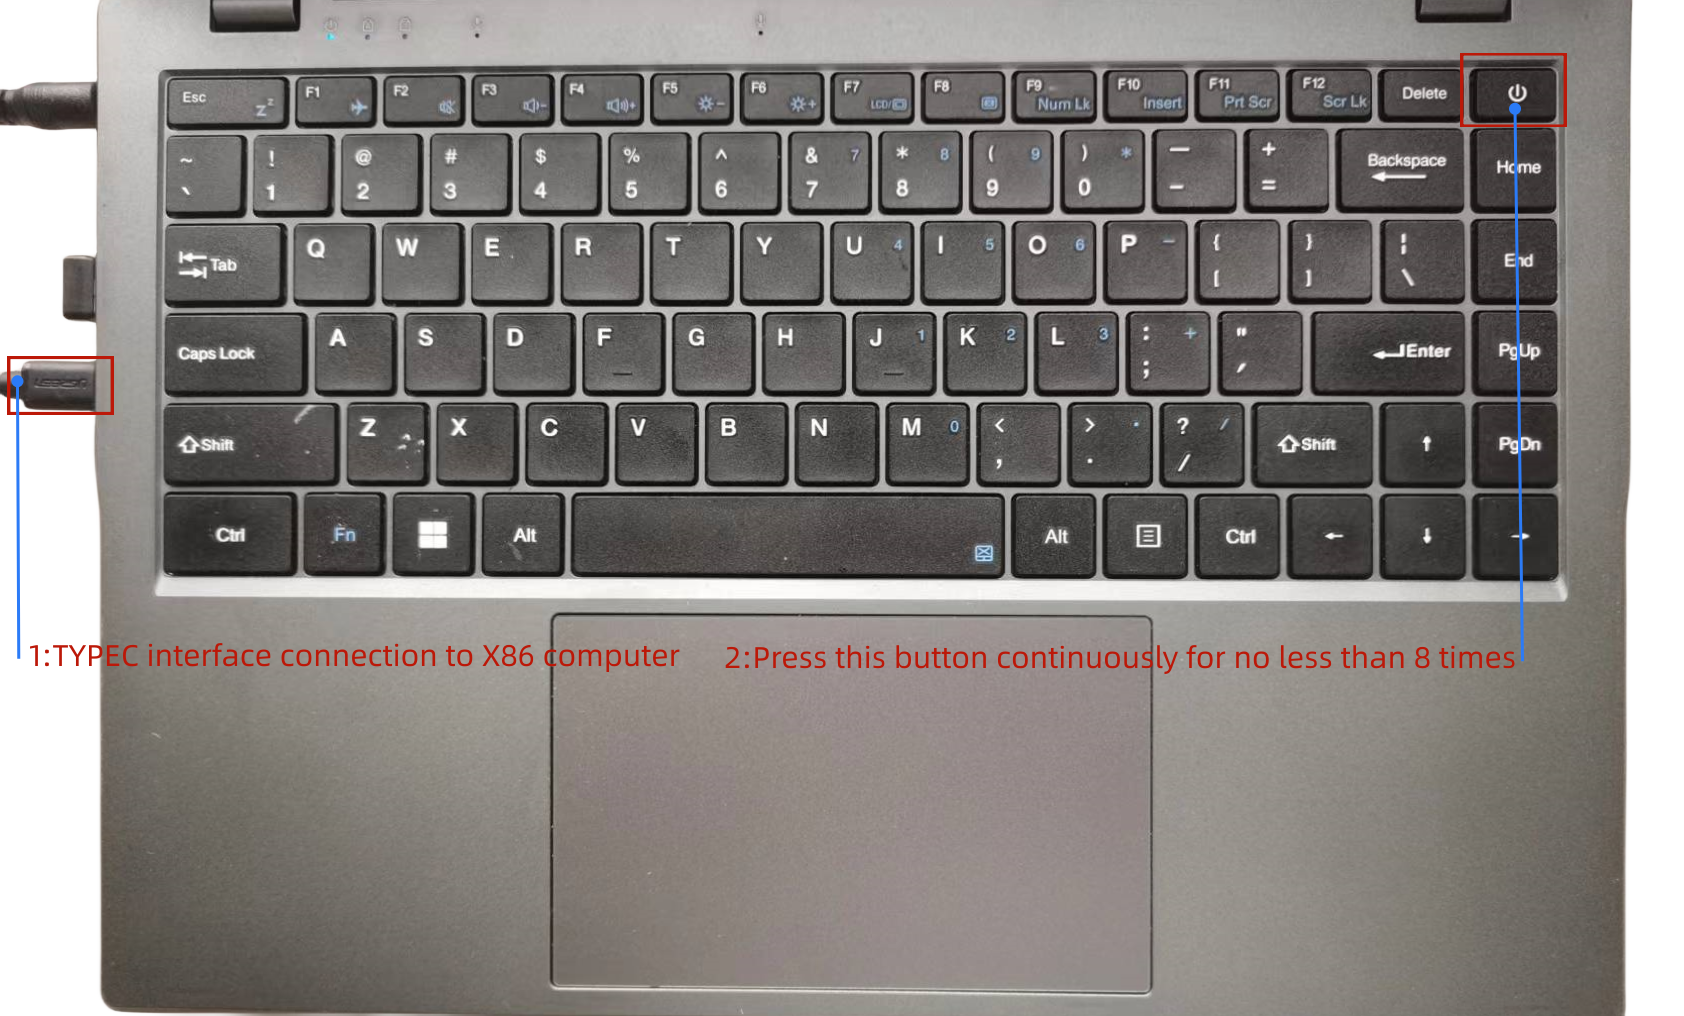
The X86 computer will recognize a UMS device.
Load image and flash
Follow the three steps shown in the figure to burn the image file. After the burning is completed, a forced restart is required. The method of forced power down is to continue holding down the power button for 10 seconds.
After downloading, restart the machine as shown in the following figure.

Update kernel
The kernel of Coolpi will continue to be updated, and users can also compile the mainline kernel themselves to upgrade the machine, following the steps below. The compilation of the kernel part in the following figure is completed on the Coolpi laptop, and users can also cross compile on the X86 computer. The method and steps are the same.
Synchronize kernel
sudo apt-get update
sudo apt-get upgrade
sudo apt-get install git
git clone https://github.com/yanyitech/coolpi-kernel.git
Compile kernel
First, install the git toolkit, and it is best to update the system to the latest version before installation. Install some kernel dependent packages, then run the compilation script, enter numbers to select the corresponding machine model, and the compilation can proceed normally.
sudo apt-get install flex bison libssl-dev
sudo ln -s /usr/bin/python3.10 /usr/bin/python
cd coolpi-kernel
./build-kernel.sh
Welcome to using Coolpi Development Board!
------------------------------------------
Please enter a number to select your machine

1. cp4b
2. cp4b-hdmi-in
3. cm5-evb
4. cm5-evb-v11
5. cm5-minipc
6. cm5-notebook
7. cm5-notebook-v20
8. cm5-8uart
9. cpnano
10. exit

Enter option number: 7
Upgrade machine kernel
After the normal compilation of the kernel, an out folder will be generated with the directory, which contains all the files required by the kernel. You can update the newly compiled kernel to the machine by using the following command.
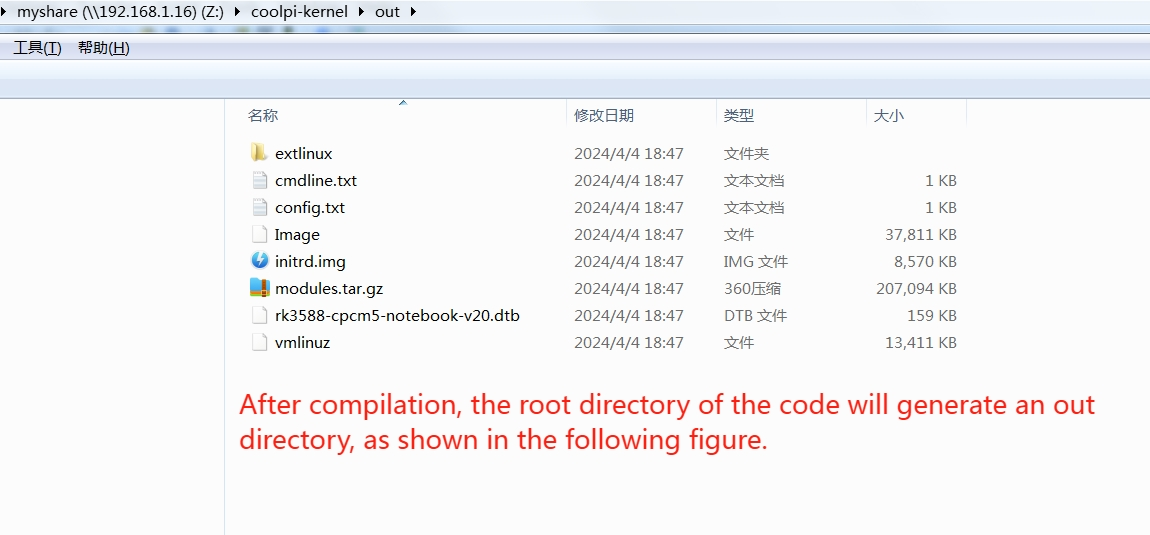
Use the following command to update the kernel.sudo cp ./out/* /boot/firmware -R sudo rm /lib/modules/* -R sudo tar -zxvf ./out/modules.tar.gz -C /lib/ sync sudo rebootIf the kernel was cross compiled using X86 machines, the kernel can be updated using the following methods:
- Use the Samba shared folder to copy the compiled files to the Coolpi machine.
- Use mobile storage devices such as USB drives to copy.
- The coolpi machine enters UMS mode, connects to the X86 computer, enters the USM mobile disk, deletes all files, and copies all files in the generated out directory to the UMS mobile disk. Then force a restart of the Coolpi laptop.
Change the startup logo
Users can update the startup logo of the machine by copying files, using the following command.
sudo cp ./logo.bmp /boot/firmware
sync
sudo reboot
Below is a standard format for a logo file that users can download and modify. Please note that the pixel size, name, and format of the file should not be changed.
logo.zip -
CoolPi-4B硬件扩展五:PWMposted in Hardware
如下表所示,40pin连接器包含7个可用于输出PWM信号的GPIO,其中PIN5 PIN12共用PWM3,PIN38 PIN40共用PWM15,这两个PWM信号同一时刻只能从一个GPIO输出,不能2个GPIO同时输出,所以40PIN连接器一共有5个独立的PWM口可以同时工作 :
序号 端口定义 描述 IO电平 设备节点 5 GPIO0_D4 PWM3_IR_M0 TTL 3.3V /sys/class/pwm/pwmchip3 7 GPIO1_B7 PWM13_M2 TTL 3.3V /sys/class/pwm/pwmchip13 12 GPIO1_A7 PWM3_IR_M3 TTL 3.3V /sys/class/pwm/pwmchip3 32 GPIO3_B1 PWM2_M1 TTL 3.3V /sys/class/pwm/pwmchip2 36 GPIO4_B2 PWM14_M1 TTL 3.3V /sys/class/pwm/pwmchip14 38 GPIO4_B3 PWM15_IR_M1 TTL 3.3V /sys/class/pwm/pwmchip15 40 GPIO3_C3 PWM15_IR_M0 TTL 3.3V /sys/class/pwm/pwmchip15 DTS配置
PWM2口配置如下,其它接口类似,首先配置PWM接口对应的pinctrl,比如PWM2为PWM2_M1,然后使能节点即可。
&pwm2 {
	pinctrl-0 = <&pwm2m1_pins>;
	status = "okay";
};
操作PWM
- 使用 echo 命令将要操作的 PWM 编号 export,注意操作需要root权限。
root@coolpi-4b:/# echo 0 >/sys/class/pwm/pwmchip2/export /*export 之后就会生成/sys/class/pwm/pwmchip2/pwm0目录*/ root@coolpi-4b:/sys/class/pwm/pwmchip2/pwm0# ls capture duty_cycle enable output_type period polarity power uevent- 使用 echo 命令设置 PWM 的周期:
echo 1000000 > /sys/class/pwm/pwmchip2/pwm0/period /*设置PWM一个周期的时间,单位为ns,即一个周期为1KHZ。*/- 使用 echo 命令设置 PWM 的占空比:
echo 500000 > /sys/class/pwm/pwmchip2/pwm0/duty_cycle /*设置PWM一个周期中“ON”的时间,单位为ns,即占空比=duty_cycle/period=50%。*/- 使用 echo 命令使能 PWM
echo 1 > /sys/class/pwm/pwmchip2/pwm0/enable -
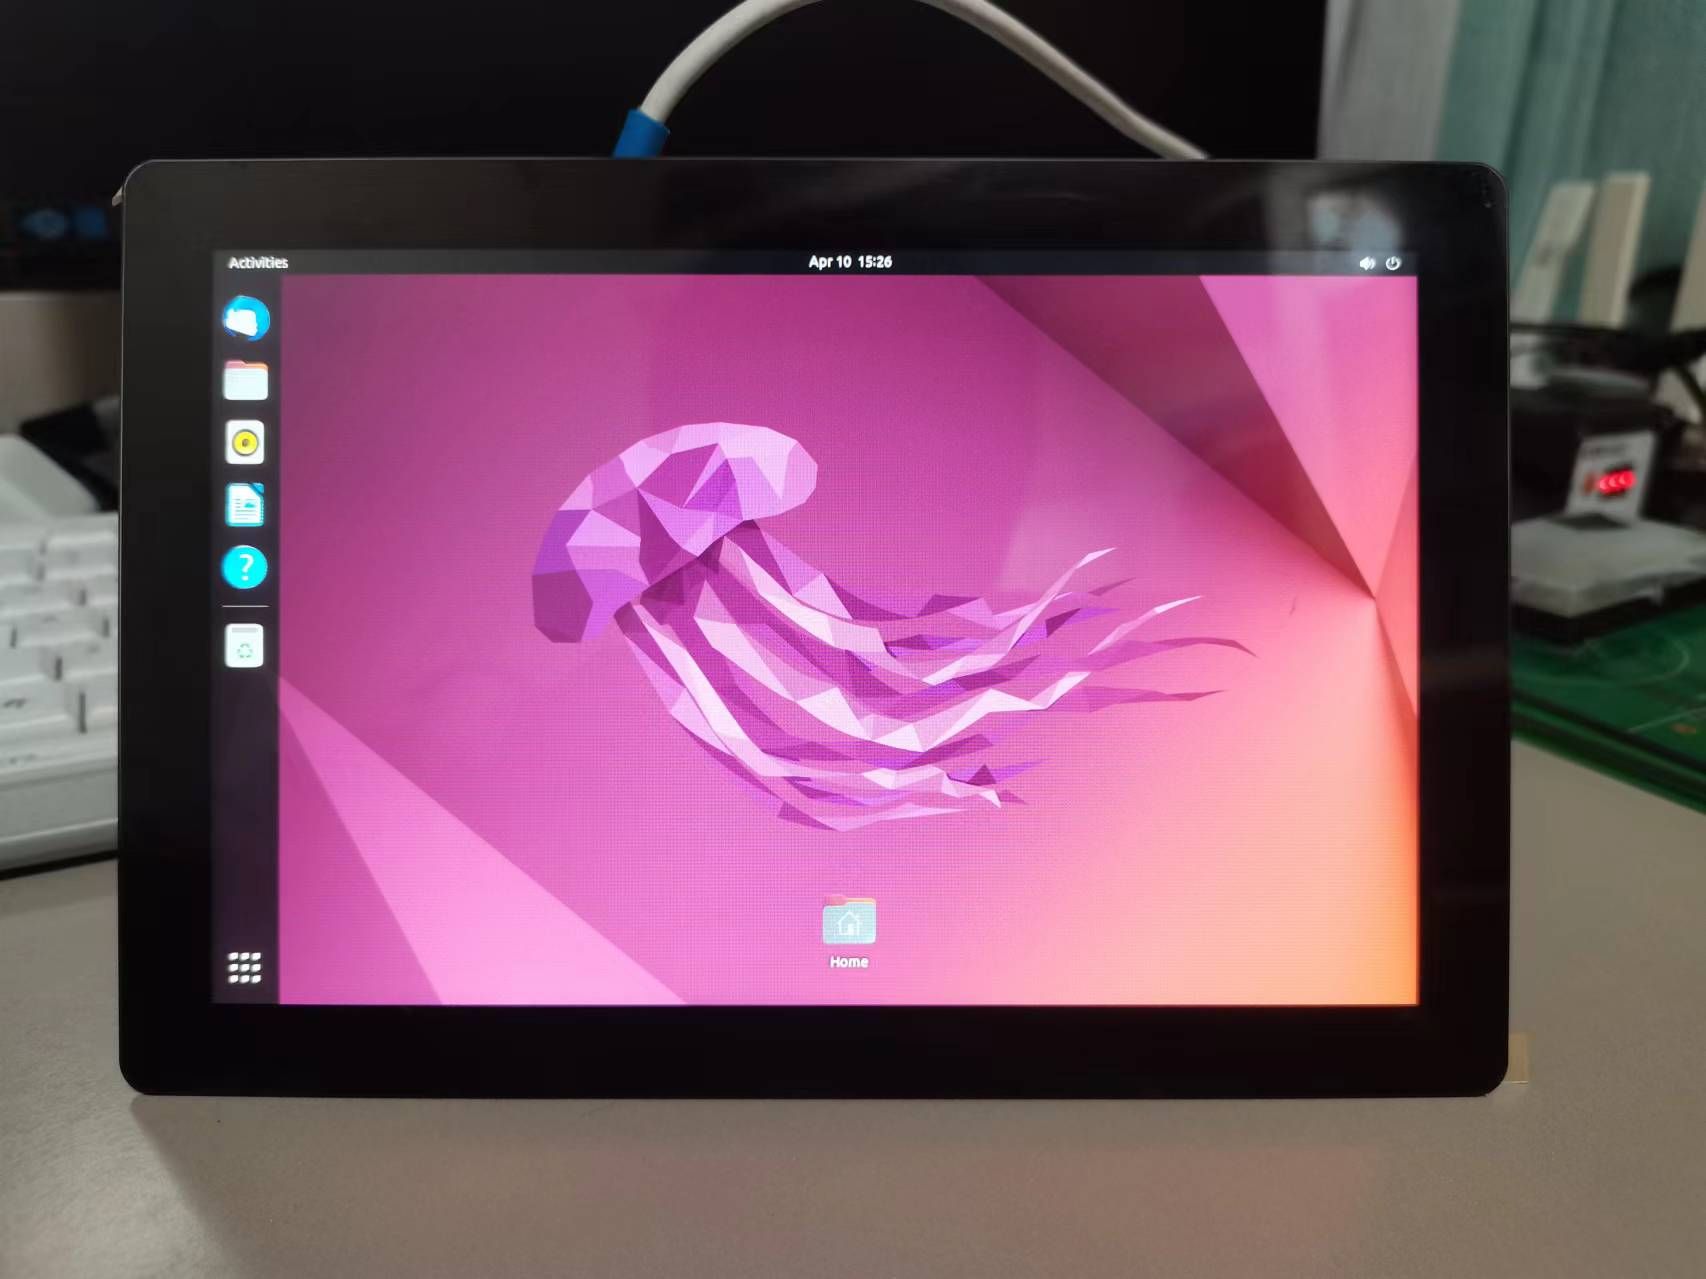
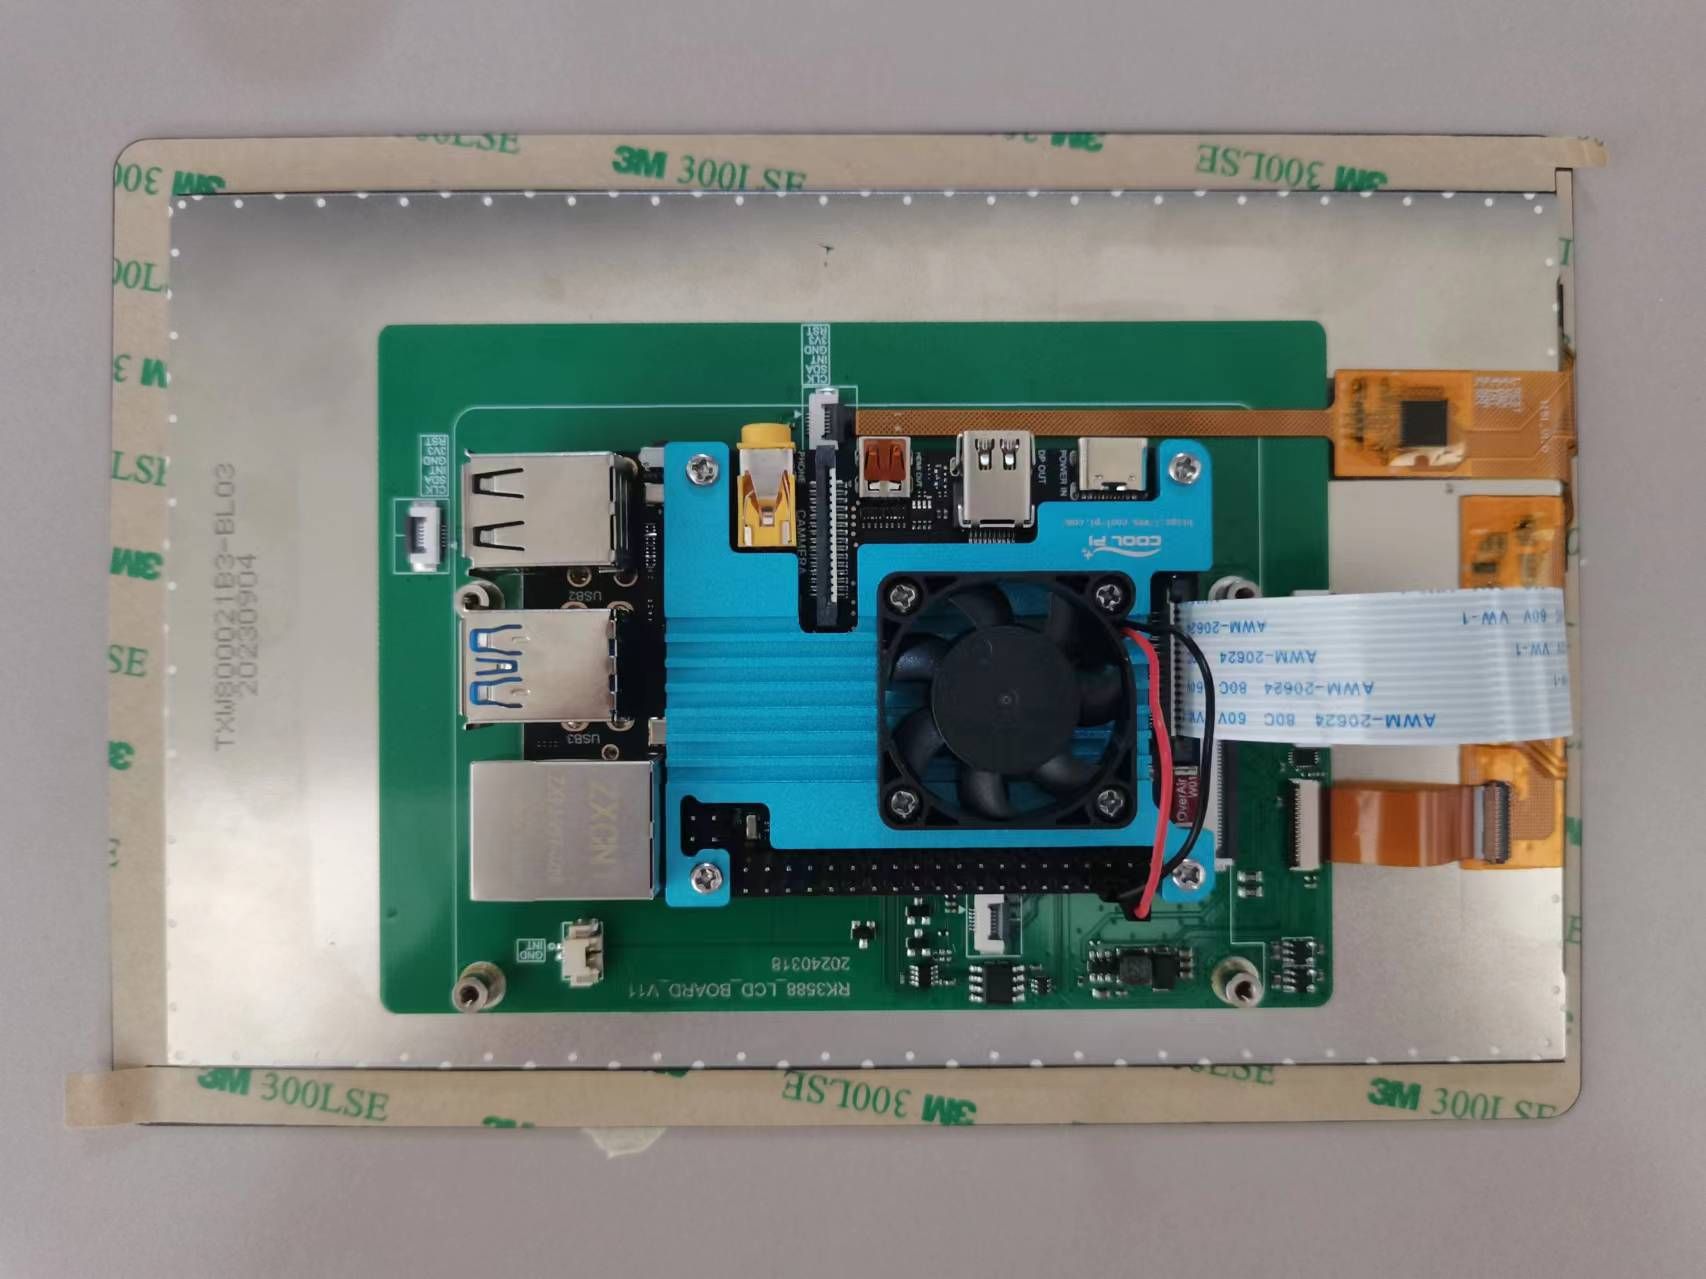
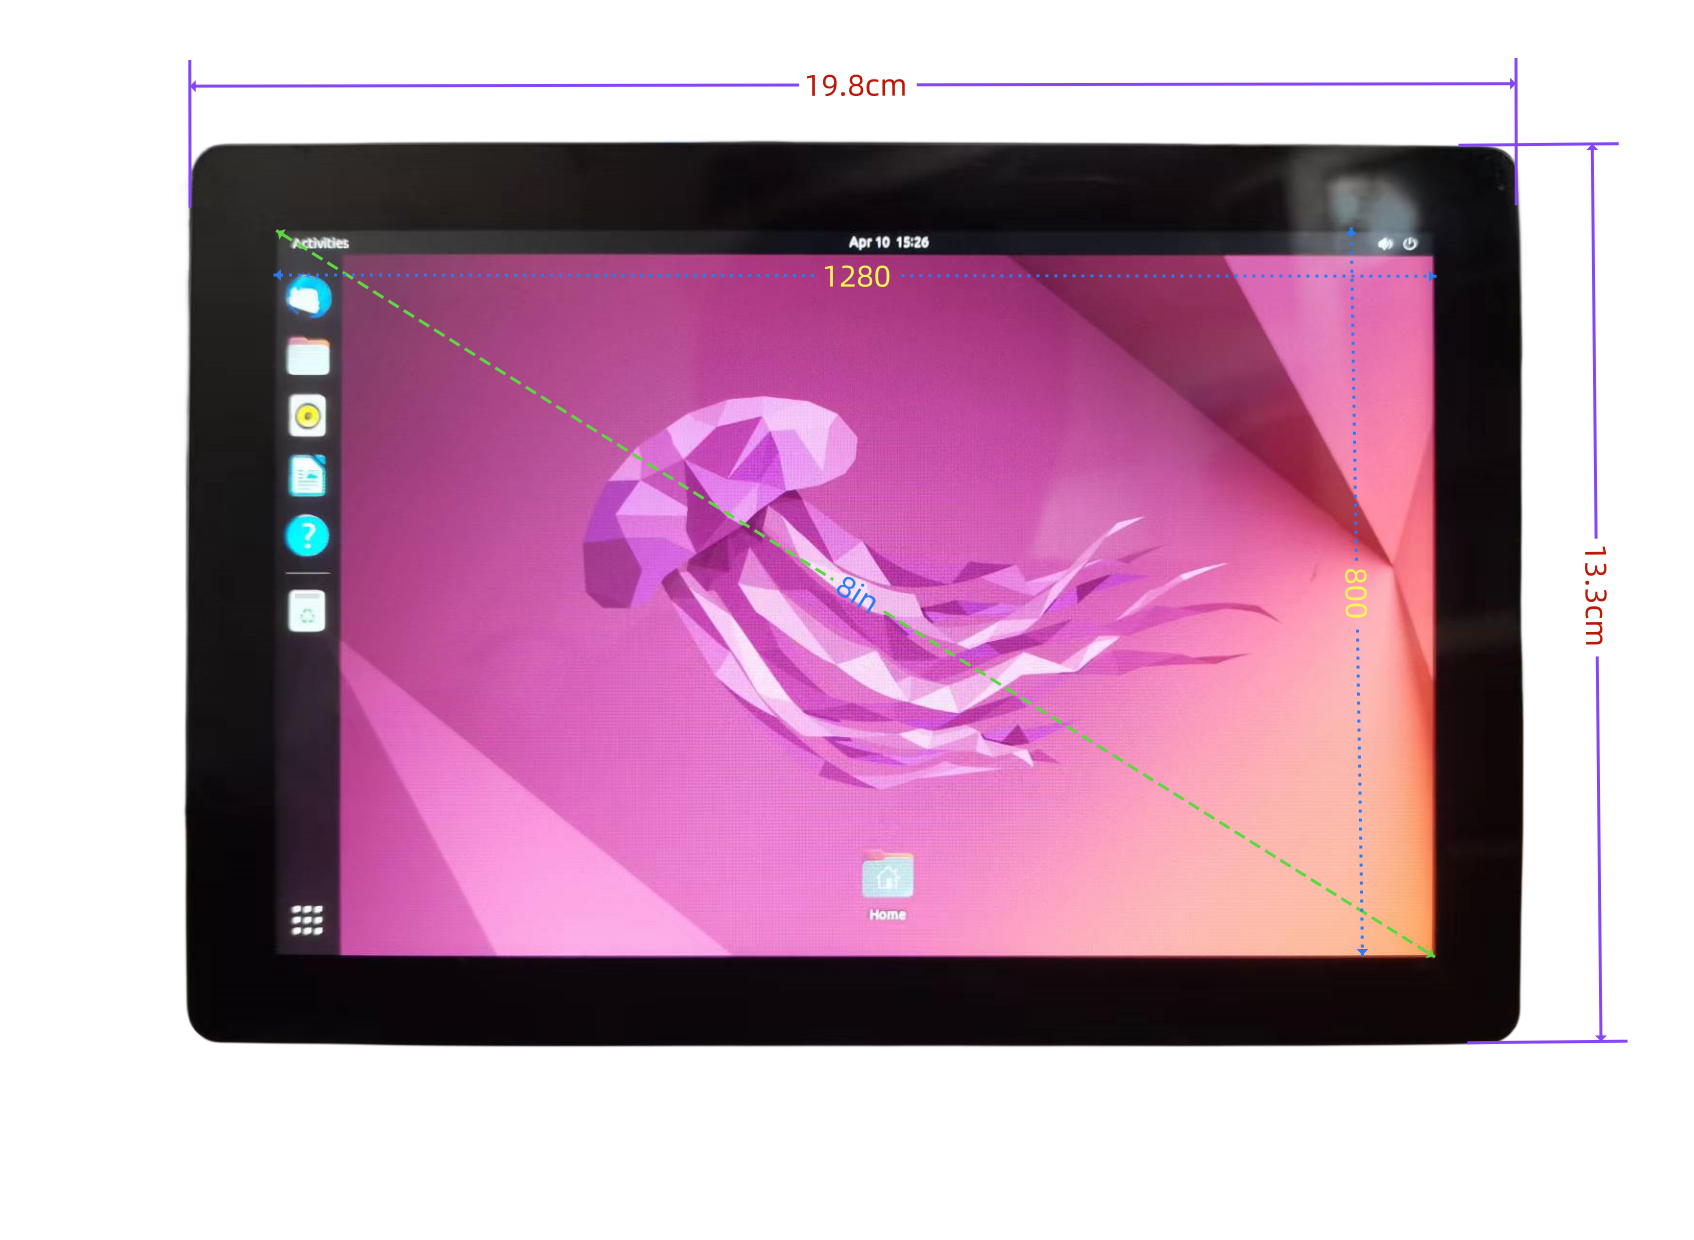
Explore unlimited possibilities - Coolpi 8-inch touchscreenposted in Peripheral
Welcome to the intersection of technology and creativity! Coolpi 8-inch touchscreen brings you an unprecedented interactive experience. This cost-effective touch screen, with its outstanding performance and unlimited possibilities, will become a powerful assistant for your innovative projects.
Product features
- Suitable size: 8 inches in size, lightweight and portable, allowing your creativity to be everywhere.
- High definition display: 800x1280 resolution, clear image, bright colors, and a higher visual experience.
- Multi touch: Supports five touch for smoother operation, allowing your fingertips to dance on the screen.
- Strong compatibility: Perfect compatibility with Coolpi CP4/CM5-EVB.
- Easy to install: With a simple design, you can easily complete the installation and get started quickly.
Application scenarios
- Embedded development: The Coolpi 8-inch touch screen can serve as the core component of intelligent hardware projects, helping you create unique embedded systems.
- Educational programming: suitable for teenagers to learn programming, easily achieve graphical programming, and cultivate innovative thinking.
- Home entertainment: It can serve as a home media center, playing high-definition videos and enjoying audiovisual banquets.
- Smart Home: Combining Coolpi's powerful scalability, create a smart home control system to make life more convenient.
- Creative display: Artists and designers can display their works through touch screens, interact with the audience, and expand their creative space.
- Portable devices: The Coolpi 8-inch touch screen can be applied to various portable devices, such as tablets, advertising machines, etc.
Reason for purchase
- High cost-effectiveness: Compared to similar products, the Coolpi 8-inch touch screen has a higher cost-effectiveness, making you value your money.
- Perfect ecosystem: Coolpi has rich community resources, providing you with a large number of tutorials, cases, and driver support.
- Quality assurance: After strict quality testing, ensure the stability and reliability of the product.
- Thoughtful after-sales service: We provide professional technical support to solve any problems you encounter during use.
- Innovation spirit: The Coolpi 8-inch touch screen inherits Coolpi's consistent innovation spirit, helping you achieve more creativity.
Mechanical dimensions
Join the ranks of Coolpi and embark on your creative journey! Let technology and art blend together to add color to your life. -
RE: Booting from USB driveposted in PI CM5 Laptop
- It is recommended to use a USB 2.0 interface driver as the boot disk.
- You can also put the system into single user mode and set the ROOT password, which will involve modifying CMDLINE.
-
RE: Would Cool Pi provide Batocera, Retropie, Lakka, Recalbox devs cool pi 4B boards for support?posted in Maker
@retroman Thank you for your suggestion. We will discuss the time point of support internally.
-
RE: Ubuntu 24.04 for CM5 Laptopposted in PI CM5 Laptop
@Rock
At present, the maximum version supported by coolpi laptop is 23.04. Ubuntu 24.04 has just been released a few days ago and adaptation will take some time. It is expected that a version will be released in May. Thank you for your support. -
创新无限,引领未来——RK3588开源笔记本震撼登场!posted in PI CM5 Laptop

尊敬的科技达人们,你是否已经厌倦了传统的笔记本电脑?是否渴望拥有一款能够完全按照自己意愿定制的开源笔记本?现在,我们自豪地宣布,基于强大的RK3588芯片,一款创新的开源笔记本正式亮相!
强大性能
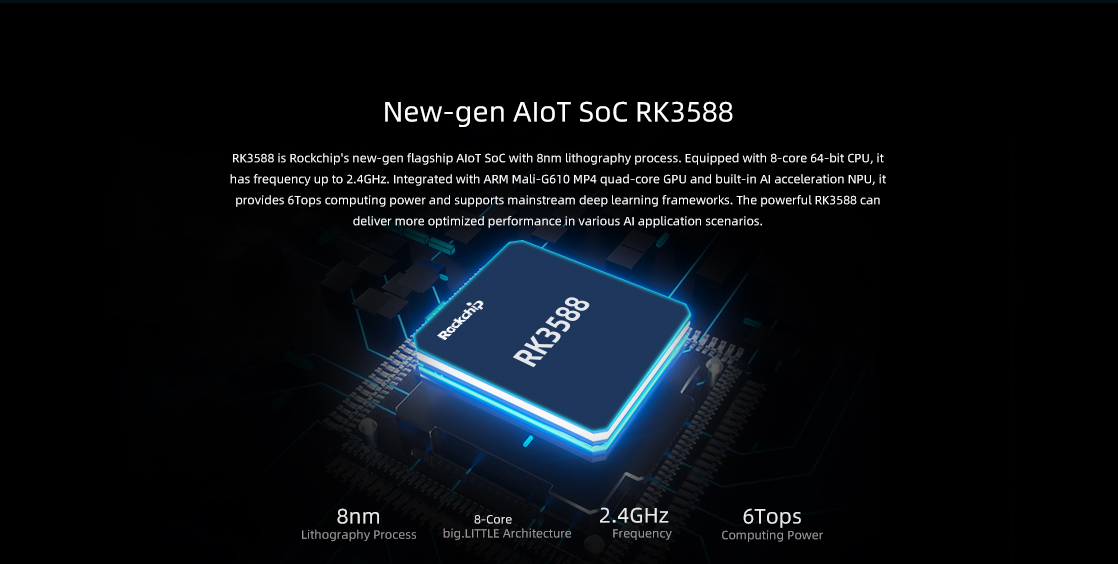
RK3588是瑞芯微电子推出的一款高性能的芯片,定位于高端市场,拥有强大的处理能力和丰富的功能特性。以下是对RK3588芯片的详细介绍:
- 核心架构:RK3588采用了先进的8nm制程工艺,搭载了ARM Cortex-A76和Cortex-A55核心,形成了混合架构设计,既保证了强大的运算性能,又兼顾了能效比。
- GPU性能:RK3588内置了强大的GPU,能够为用户提供流畅的高清视觉体验。这使得RK3588非常适合应用于需要高性能图形处理的场景,如游戏、虚拟现实等。
- AI能力:RK3588集成了高性能的NPU(神经网络处理器),支持AI运算,适用于各种AI应用场景,如图像识别、语音处理等。
- 内存和存储:支持LPDDR4X内存和多种存储接口,包括eMMC、NVMe SSD等,提供快速的数据读写能力。
- 连接性:具备丰富的网络连接功能,包括PCIE网卡、Wi-Fi 6、蓝牙5.0等,满足高速网络需求。
- 多媒体支持:支持多种视频和音频编解码格式,提供高品质的多媒体体验。
- 扩展性:提供多种接口,包括全功能TYPEC、PCIe、HDMI等,支持多种外设和显示设备连接。
- 应用场景:RK3588适用于多种高性能设备,如笔记本电脑、智能电视、家庭娱乐中心、AIoT设备等。
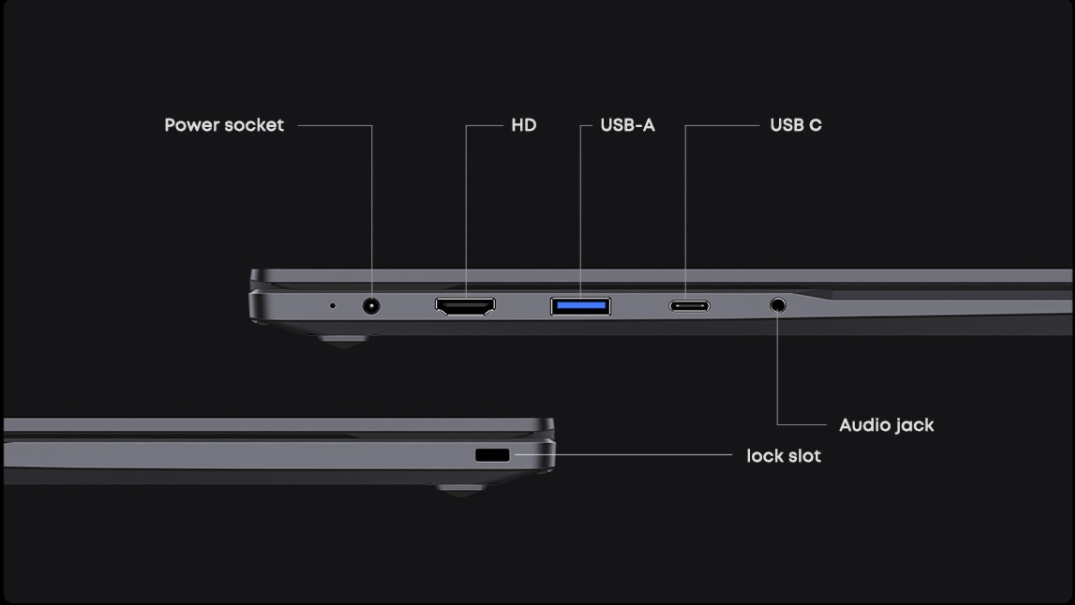
多扩展接口
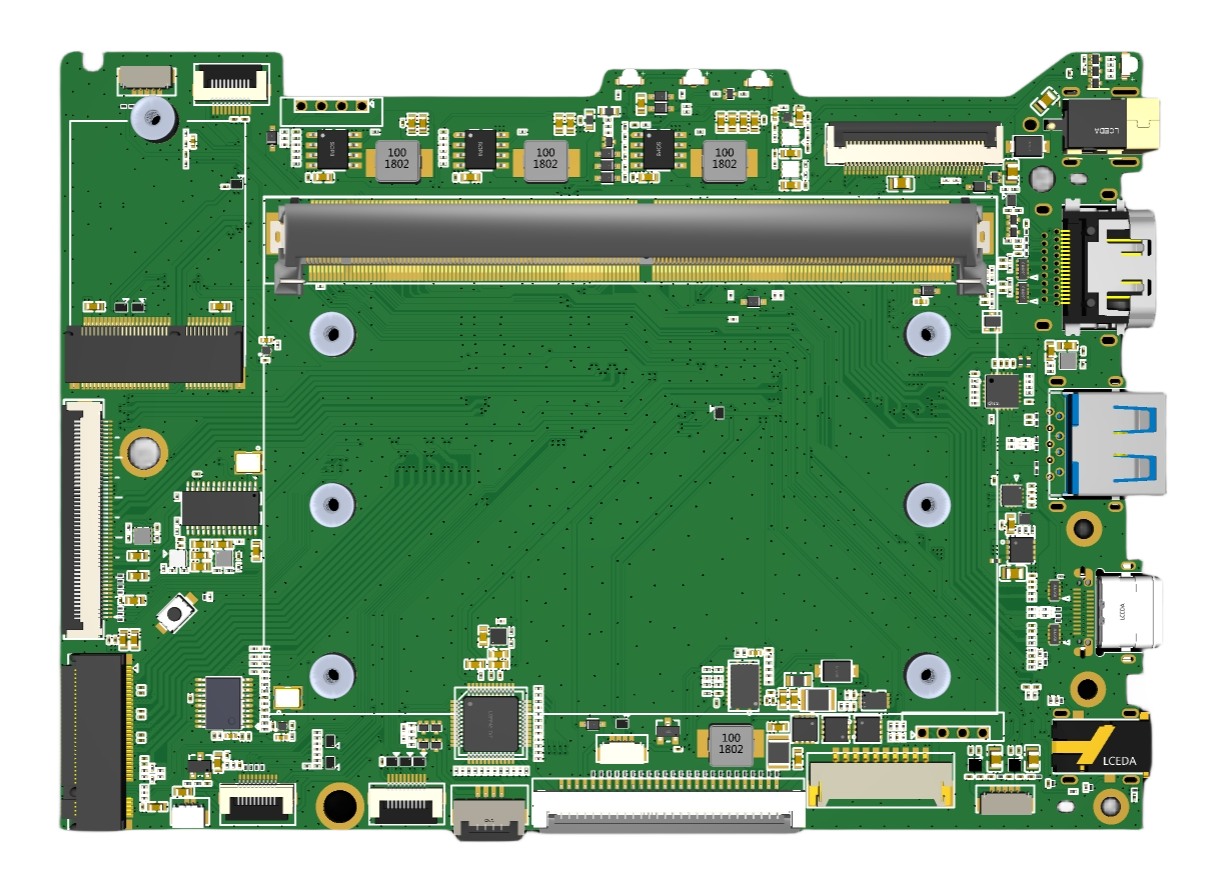
丰富的接口设计,包括PCIE、USB、HDMI、TYPEC等,满足你的各种连接需求,让你无缝连接外部设备。机器主板有丰富的IO扩展功能,如PCIE-M2、USB3.0、USB2.0、SDMMC、I2C、SPI等,方便用户二次开发。
- 外部接口
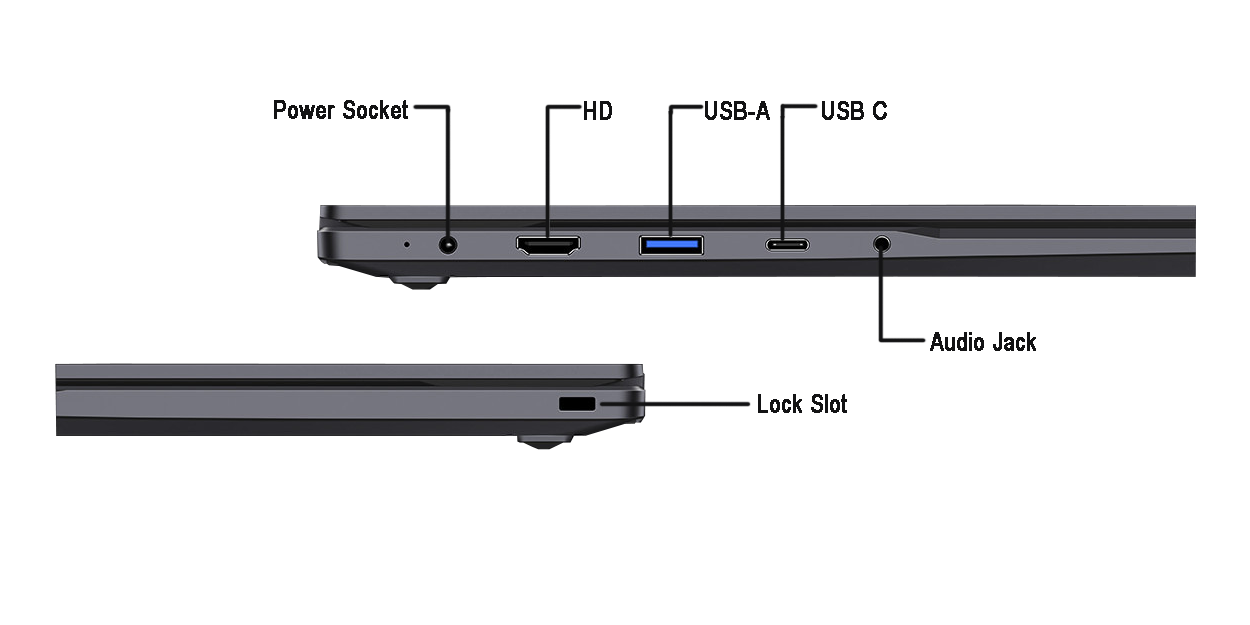
- 内部接口
开源自由
开源笔记本基于自由开放的软件平台,你可以自由定制操作系统、软件应用,实现个性化定制,发挥你的创造力。
-
WIKI知识库 https://wiki.cool-pi.com/en/home
-
镜像地址 https://pan.baidu.com/s/1CMBGGhGUMMDpg88-WulGWw?pwd=4rjd#list/path=%2F
便携设计
轻薄便携的设计,让你随时随地携带,轻松应对移动办公、学习和娱乐的需求。

数据安全
注重用户隐私和数据安全,采用硬件加密技术,确保你的数据安全无忧。
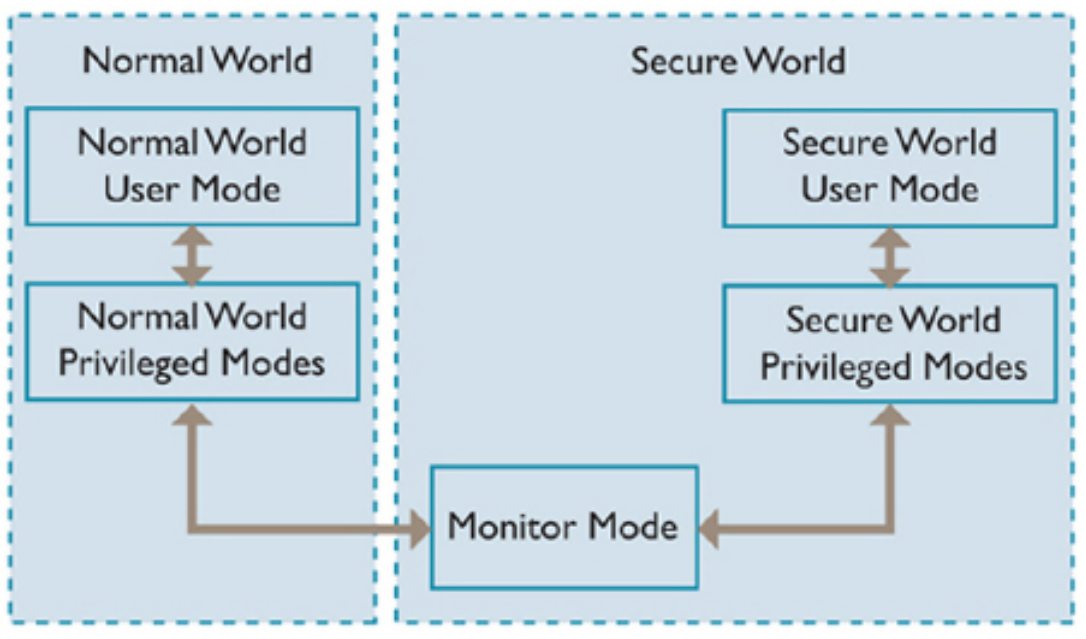
支付、网上银行、内容保护和企业身份验证之类的应用可通过利用TrustZone技术增强型设备所提供的三
个关键要素来提高其完整性、功能和用户体验:- 面向软件的安全执行环境,可防止从富操作系统发起恶意软件攻击
- 已知良好的硬件信任根,可在富操作领域检查数据和应用程序的完整性,确保安全环境不受到损害
- 按需访问安全外设,如内存、键盘/触摸屏,甚至显示器
系统定制
支持多种linux发行版ubuntu、debin、armbian、buildroot、麒麟、统信等,支持安卓系统,支持用户自定义软件界面,支持原生应用开发。提供完善的技术支持。
社区支持
作为开源项目,我们拥有活跃的开发者社区,你可以与其他开发者交流心得,共同学习和进步。
社区地址 https://cool-pi.com/

立即加入我们,一起探索开源笔记本的无限可能!让科技与你同行,共创美好未来!
RK3588开源笔记本,引领科技潮流,打造个性化电脑新体验!
-
RE: CoolPi 4B硬件扩展一:40PIN接口介绍posted in Hardware
@AugustRobot_Zou 按照5V 3A的标准来配置。一般散热按照12W评估。正常工作也就5W左右。